4. Working with Files


This chapter introduces the concepts behind working with files in the CodeWarrior IDE.

In this chapter we discuss opening, creating, saving, closing, comparing, and printing files in the CodeWarrior environment.

To learn about editing files, refer to "Editing Source Code" on page 133.

To learn about working with files using revision control systems, refer to "Using CodeWarrior IDE with Version Control Systems" on page 581.

The sections in this chapter are:


Creating a New File

To create a new untitled window where source code or text may be entered, choose the New Text File command from the File Menu.

After the new window appears, a text insertion point appears on the first line of the window. The CodeWarrior IDE places text that you type at this insertion point.

To learn more about text editing in the window you have just created, see "Editing Source Code" on page 133.


Opening an Existing File

There are several ways to open a file with the CodeWarrior IDE. The methods discussed here are:


NOTE

You cannot open libraries with the CodeWarrior editor because of their binary format.

Opening Files from the File Menu

You can open two types of files:


Project file

To open a project file, choose the Open command from the File Menu. For information on opening CodeWarrior project files, see "Opening an Existing Project" on page 67.


Text file

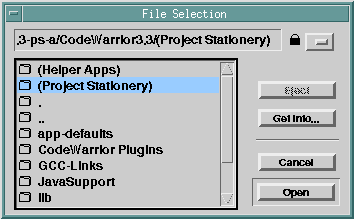
To open a text file or a source code file, choose the Open command from the File Menu. The IDE displays an Open dialog box, as shown in Figure 4.1 (Windows), Figure 4.2 (Mac OS), and Figure 4.3 (Solaris).


Windows

From the Files of Type pop-up menu, select All Files. The list of files changes to show all the files in the current folder, including text files.


Mac OS

The dialog box displays a list of the available project and text files in the current folder. If the file is a stationery text file, the IDE will open a new, untitled editor window and copy the contents of the stationery file into the window.


Solaris

The dialog box displays a list of the available project and text files in the current directory.
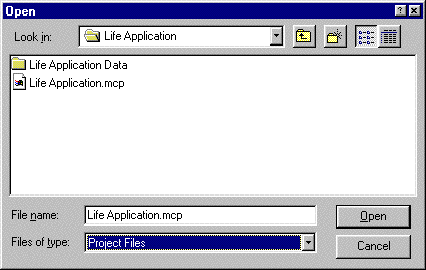
Figure 4.1 Open dialog box (Windows)


Select the file you would like to open, and click Open. The CodeWarrior IDE opens the file in an editor window.

For more information about editing source code, see "Editing Source Code" on page 133.
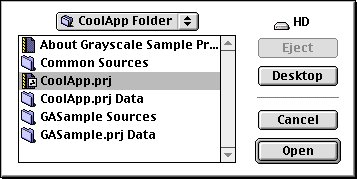
Figure 4.2 Open dialog box (Mac OS)


Figure 4.3 Open dialog box (Solaris)


Opening Files from the Project Window

There are different ways to open files from within the project window, depending on the type of file you wish to see. These different ways are:


TIP

(Mac OS) Files that contains binary data cannot be opened and displayed in a CodeWarrior editor window. If the file was created using another application, double-clicking the file name in the File column will open the file in the application that created it. Refer to "Disassembling Source Code" on page 373 to learn how to view the contents of a library file.

File column

If the file you wish to see appears in the File column of the project window's File or Link Order views, double-click the file name to open it. If the file is a text file, CodeWarrior opens it in an editor window.


Mac OS

On the Mac OS, if the file is any other type, the CodeWarrior IDE opens the application that created the file. If the file is a binary file, such as a library file, it will not be opened, because binary files are not viewable using printable characters.

Another way to open a file is to select it, and then press the Enter/Return key. You can select multiple files in the Project window, and open them all by pressing the Enter/Return key. If you do not know how to select multiple files in a project, refer to "Selecting Files and Groups" on page 76.

For more information about the File Column, refer to "File column" on page 44.


TIP

To open several files from the File Column at one time, hold down the Ctrl/Command key and click each file that you want to see. Then, double-click on one of the selected files.

Group pop-up menu

Another way to open a source file is to use the Interface pop-up menu for a group. A similar menu is shown in Figure 4.4. From this pop-up menu you may select the file in the group that you want to open.

You can open a source file by choosing it from the Interface pop-up menu menu for the group that contains the file. This works even if the group is collapsed and the file is not visible in the project window.


Interfaces pop-up menu

To open a header or interface file, click on the Interface pop-up menu to see a list of files. Select the file you want to open from this list, as shown in Figure 4.4.

Figure 4.4 Interfaces Files pop-up menu in the Project window


Note that header files inside "<...>" are system header files located within the Metrowerks CodeWarrior folder. Files without these symbols are header files that you have created. Your header files are stored in the same folder as your project or other Access Paths you have designated. To learn more about Access Paths and how to configure them, refer to "Access Paths" on page 323.


TIP

To switch between a source file and its interface file, use the same name for both files, except for the extension. For example, name your files foo.cpp and foo.h. Then press Ctrl/Command-\Q to instantly switch between the two files.

When the Interfaces File Pop-up is clicked for a library file that is part of your project, you will only have the option to Touch or Untouch the library file. Since libraries do not contain header or interface files, these files can not be opened from a pop-up corresponding to a library file.

To learn more about touching files, see "Touching and Untouching Files" on page 89.


Opening Files from an Editor Window

To open an interface file from within a source file you are editing, click the Interface Pop-Up Menu at the top left of the editor window as shown in Figure 5.2 on page 136. This pop-up menu lists all interface or header files used by the source file. Select a file from the Interface Pop-Up Menu to open it in a new editor window.


NOTE

If there are no files available in the menu, it means your text file does not contain source code, or that the source file has not yet been compiled.

Here is a different method. If you are editing any source code file, you can open an interface file mentioned anywhere in the text file with the Find and Open `Filename' command.

First, select text in the editor window containing the name of the interface file you would like to open. An example of a file name you might see in a C source code file is stdio.h. You could select stdio.h by double-clicking on the stdio portion of the text. Then, choose the Find and Open `Filename' command from the File Menu.

The CodeWarrior IDE then searches for the file and opens the file in an editor window. If the IDE cannot find the selected file, a system beep sounds.

There is another method for opening a file. The following example demonstrates the usefulness of this method. Suppose you are editing a C++ .cpp file. Press Ctrl/Command \Q to open a new editor window and display the .h file that corresponds to the .cpp file. Type the same keyboard shortcut again to display the .cpp file.

In order for this keyboard shortcut to work, your source and interface files must have the same name, excluding the file name extensions. For example, if you are editing myFile.cpp and you want to see the associated interface file, press Ctrl/Command \Q to display myFile.h in a new editor window. To find these related files, the IDE searches a project according to the items in the Access Paths settings panel. To learn more, refer to "Access Paths" on page 323.

If you are editing a source code file and want to open a file without selecting any text, choose the Find and Open File command from the File Menu. This command will use the settings in the Access Paths for the project to search for the file to open.

After you choose Find and Open File, the CodeWarrior IDE then displays a dialog box, as shown in Figure 4.5. Type the name of the file you wish to search for in the Open editable text field.
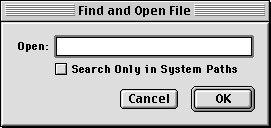
Figure 4.5 Find and Open File dialog box


If you want to search both System Paths pane and User Paths pane directory paths (all paths specified in the Access Paths), turn the Search Only in System Paths option off.

To search only the CodeWarrior directory structure (the paths specified in the System Paths pane of the Access Paths), click on the Search Only in System Paths option to enable it.

To learn more about Access Paths and how to configure them, refer to "Access Paths" on page 323 for more information.


Opening a Related File

If you are working in a source code file and wish to open the corresponding interface file, or working with an interface file and wish to open the corresponding source file, use the Ctrl/Command \Q keyboard shortcut. You can use this shortcut to easily switch back and forth between the two files.


Saving a File

This section describes the many ways that the CodeWarrior IDE can save files. The topics discussed are:


NOTE

(Mac OS and Solaris) When saving a file, you will often have the option of saving it as a stationery file. A stationery file is like a template or "starter" file. For example, creating a stationery file would be useful if you had standard documentation header text that you wanted to appear at the top of every file you create. If you create a stationery file with the header text, you could start every new file by opening this stationery file. See "Opening Files from the File Menu" on page 108 for more information.

Saving one file

To save your changes to the current editor file, choose the Save command from the File Menu. The CodeWarrior IDE saves your file to your hard disk.

The Save command is dimmed if the window is new and has no data, if the contents of the active window have already been saved, or when the active window is the project window.


NOTE

If the file is new and untitled, the CodeWarrior IDE displays the Save As dialog box, described in "Renaming and saving a file" on page 116. Choose a name and location for your new file with this dialog box.

Projects are saved when they are closed, when you quit or exit the CodeWarrior IDE, or when the Save A Copy As command is selected. You don't need to explicitly save projects.


Saving all files

To save your changes to all the files currently open, press the keyboard shortcut Shift-Ctrl-S (Windows) or Option-Command-S (Mac OS). The CodeWarrior editor saves all the modified files to your hard disk.


Saving files automatically

The CodeWarrior IDE can automatically save changes to all your modified files whenever you choose the Preprocess, Precompile, Compile, Disassemble, Bring Up To Date, Make, or Run commands from the Project Menu.

Using the Save open files before build feature can save your work if your program should crash while running. However, if you're experimenting with a change and don't want to save changes, you may want to turn this option off.

To learn about how to enable or disable this feature, refer to the Save open files before build option in the section of this manual titled "Editor Settings" on page 269.


Renaming and saving a file

If you want to save a new untitled file or save a file under a new name, use the Save As command on the File Menu. If the file is in the current project, the CodeWarrior IDE updates the project to use the new name.

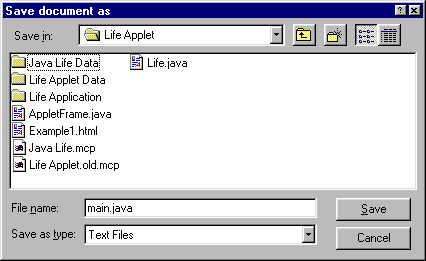
When you choose Save As from the File Menu, the CodeWarrior IDE displays the dialog box shown in Figure 4.6 (Windows), Figure 4.7 (Mac OS), or Figure 4.8 (Solaris).


Mac OS and Solaris

Choose the Text or Stationery button to save the file as either a text file or a stationery file.


NOTE

(Mac OS) Beginning with Mac OS 8.5, the dialog box that you see when you select the Save As command will no longer appear as shown in Figure 4.7. Instead of clicking the Stationery radio button directly, you must first tell the IDE that you want to use the stationery option. To do this, select Stationery Option from the Format pop-up list. When the Stationery Option dialog box appears, click the Stationery radio button and click OK.

Figure 4.6 Save As dialog box (Windows)


Choose the file location and name the file, then click the Save button.

The CodeWarrior IDE saves the file and changes the name of the editor window to the name you entered.

If the file is in the current project, the CodeWarrior IDE changes the file's entry in the project to match the saved name. If you don't want to change the project, but still want to save the file, you can refer to the following section, "Backing up files."


Backing up files

If you want to save a backup copy of a text file before you make some changes to the original, use the Save A Copy As command in the File Menu. The CodeWarrior IDE creates a copy of the file under a new name that you specify, but leaves the original file unchanged and does not change the currently-open project to use the new file name.
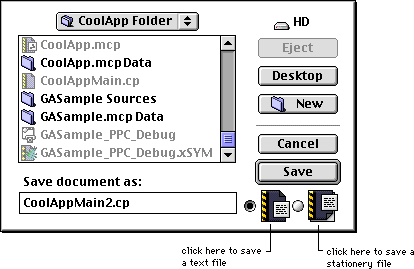
Figure 4.7 Save As dialog box (Mac OS)


After choosing Save A Copy As from the File Menu, the CodeWarrior editor displays the dialog shown in Figure 4.6 (Windows), Figure 4.7 (Mac OS), or Figure 4.8 (Solaris). Specify the file's new location and choose a unique name for the file.


Mac OS and Solaris

You can also choose whether to save the file as text stationery or a text file.

Now click Save and CodeWarrior saves a version of the file with your new name. It does not change the file in the editor window or in the current project.

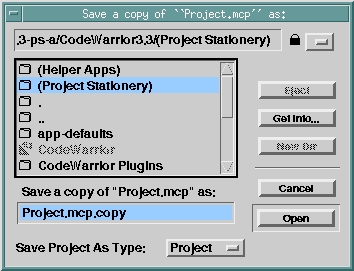
If the project window is the active window, Save A Copy As allows you to save the project using a new name, or as a text file. You decide which type of project to create using the Save Project As Type pop-up menu shown in Figure 4.9. If you save the project as a text file, that text file will contain the names of all the files in the project.
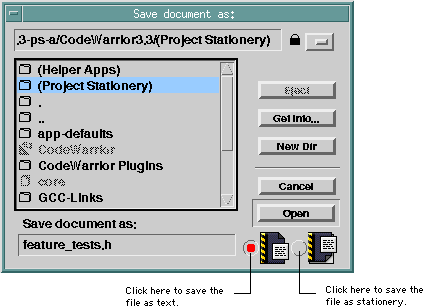
Figure 4.8 Save As dialog box (Solaris)


Saving as a MS-DOS, Mac OS, or UNIX text file

When you open a text file originally created in a Windows, Mac OS, or UNIX text editor, CodeWarrior internally converts the text file to be compatible with the host platform and corrects inconsistent line endings. When you finish editing the file, CodeWarrior saves the file in its original format.

To learn about saving a text file under a different text format, see "Options Pop-Up Menu" on page 138.
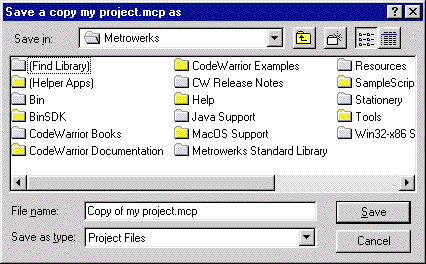
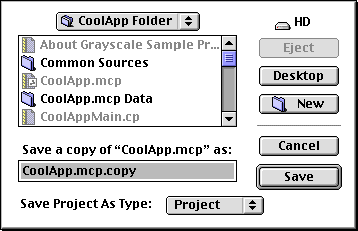
Figure 4.9 Saving a copy of a project (Windows)


Figure 4.10 Saving a copy of a project (Mac OS)


Figure 4.11 Saving a copy of a project (Solaris)


Closing a File

Every editor or project window in the CodeWarrior IDE that you have opened is associated with a file on the hard disk. When you close the window, you close the file. You can close all windows or just a single CodeWarrior IDE window.

The topics in this section are:


Closing One File

To close a window, choose Close from the File Menu.

If you close a text file using the File Menu and have not yet saved your changes, the CodeWarrior IDE asks if you want to save the changes before closing the window, as shown in Figure 4.12. If you choose to close the file without saving your changes, all changes are lost.
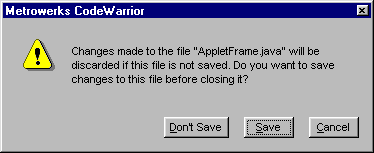
Figure 4.12 The dialog box for unsaved changes


Another way to close a window is by clicking the close box of the active window. This is exactly the same as choosing the Close command in the File Menu.

Closing an active project window automatically saves the project, and you will not see the dialog shown in Figure 4.12. For more on saving project files, consult "Saving a Project" on page 72.

The Close command also saves other properties of the window, such as the size, location, and the selected text in the active window. Refer to "Editor Settings" on page 269 for information on how to configure these options. If the appropriate options are enabled, the next time the source code file is opened, it will occupy the same position on your screen and the same text will be selected.


Mac OS

The Close command saves the window position information in a format that is compatible with the Macintosh Programmer's Workshop (MPW). If you open a saved CodeWarrior editor file with MPW, the same window parameters are respected. For more information about MPW, refer to the documentation on the CodeWarrior Reference CD.


Closing All Files

To close all open windows, use the Close All command. If you modified any file during the edit session, the editor prompts you to save information before closing each window that contains changes.

Close All only closes editor and debugger windows. The Find dialog box, as well as project windows, remain open.


Windows

This command is available by pressing Ctrl-Shift-W.


Mac OS

This command is available when you press the Option key before clicking on the File menu.


TIP

To close all editor windows at once, press Alt/Option and click on the close box of an editor window.

Printing a File

Use the print options in the CodeWarrior IDE to print open files, a project file, or the contents of a window.

The topics in this section are:


Setting Print Options

To configure printing options, choose the printer setup appropriate for your platform. CodeWarrior displays the appropriate printer dialog box. Choose Print Setup (Windows) or Page Setup (Mac OS) from the File Menu to display the printer dialog box.

Use this dialog box to select the paper size, orientation, and other settings. The specific settings and options depend on the printer you have connected to your computer. For more information on using your printer, consult the documentation packaged with your computer and printer.

If you Click OK, CodeWarrior saves the options for the next time you print any files.


Printing a Window

To print a window, make the window active and choose the Print command from the File Menu. This menu command allows you to print some or all of the active window.

When you choose this command, the CodeWarrior IDE displays the print dialog box for your printer. There are two additional CodeWarrior-specific options available for configuration in this dialog box. Depending on your printer and printer software, these options may be displayed in various places in different print dialog boxes.

The CodeWarrior-specific options are:


Print Selection Only

If there is selected text in the editor window you are printing, the Print Selection Only option appears. When this option is on, the CodeWarrior IDE prints only the selected text in the window, not the entire file. When this option is off, the CodeWarrior IDE prints the entire file.


Print using Syntax Highlighting

When the Print using Syntax Highlighting option is on, the CodeWarrior IDE prints the file with syntax coloring. On a black and white printer, the colors come out as shades of gray. When the Print using Syntax Highlighting option is off, the CodeWarrior IDE prints the file in black and white without syntax coloring.


TIP

(Mac OS) To print color syntax-highlighted text in bold and comments in italics, choose Black & White printing from the Print dialog box and turn on Print using Syntax Highlighting.

When you are finished configuring printing parameters, click the Print button in the printer dialog box. The CodeWarrior IDE then spools the file to your printing software for printing.

For information on other options in the print dialog box, see the documentation that came with your printer or printer software.


Reverting to a Previously-Saved File

If you've opened a text file and started editing it, then realize that you don't want to use the changes you've made, use the Revert command on the File Menu. When you select this command the dialog box shown in Figure 4.13 appears.
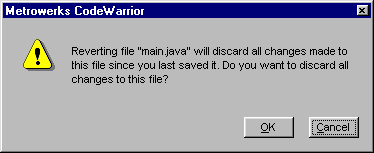
Figure 4.13 Revert to a Previous File


If you click the OK button, the last copy of the file you're working with will be opened, and all changes you have made since the last time you saved the file are lost. If you click Cancel, the file you're working with is not changed or saved to disk, and you can continue editing it.


Comparing and Merging Files & Folders

The CodeWarrior IDE has a facility to compare two text files, mark the differences between the files, and apply changes between the files. In addition, you can compare the contents of two folders.

The topics in this section show you how to use the IDE's file comparison features:


File Comparison and Merge Overview

The IDE's file comparison window displays two text files and the differences-insertions and deletions- between them. Figure 4.14 shows an example file comparison window. The window has controls to examine, add, and remove the differences between the files. The currently selected difference is shown with a darker color and outlined in black to contrast it from the other differences visible in the window.

The file comparison window has these parts:
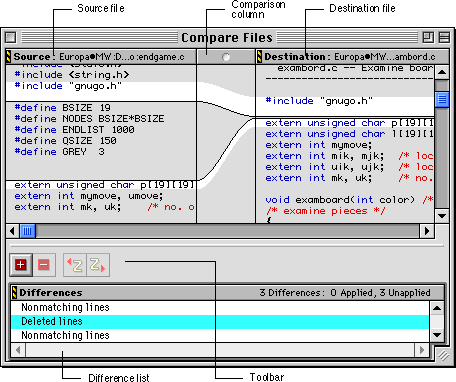

Source file

Displays the source text file that IDE uses as a basis for its comparison with the destination file. This pane appears on the left side of the file comparison window.


Destination file

Displays the source destination file that's compared with the source file. This pane appears on the right side of the file comparison window. Differences between the source file and the destination may be added to or removed from the destination file.

Figure 4.14 The file comparison window


Comparison column

Shows a graphical representation of where text was added or removed between the source and destination files. This column appears between the source and destination panes in the comparison window.


Difference list

Lists the insertions, deletions, and lines of mismatching text between the two files. Selecting an item in the list displays the difference in the source and destination panes. The comparison column also shows how and where the difference occurs between the two files. Text in the difference list will appear in italics when a difference is applied.


Toolbar

Has buttons to apply or remove changes between the two files to the destination file. Table 4.1 describes the toolbar's buttons. The toolbar also has buttons to undo and redo changes to the source and destination files. For information on configuring toolbars, see "Customizing the IDE" on page 289.

Table 4.1 Common toolbar buttons

Button
Description
Apply difference
Unapply difference
Undo
Redo


Choosing Files To Compare

To open a file comparison window, choose Compare Files from the Search Menu to show a dialog box that prompts you for two files, source and destination files, to compare. To use a file dialog box to browse for the source and destination files, click their respective Choose buttons. You may also drag and drop text files into their respective boxes.


Windows

Make sure that the Compare Files radio button, shown in Figure 4.15, is enabled. This allows you to select files by using the Choose buttons.


Text Compare Options

Select the Case Sensitive checkbox to consider the case of letters as part of the comparison operation. To ignore the case of letter, deselect this checkbox.

To take space and tab characters into account while comparing, select the Ignore Extra Space checkbox. To ignore extra space and tab characters, deselect this checkbox.

See "Folder Compare Options" on page 130 for information on the folder comparison options.

To show the comparison window after choosing files and setting options, click the Compare button.

Figure 4.15 Compare Files Setup dialog box


Examining and Applying Differences

Use the comparison window's toolbar and difference list to choose among the differences between the source and destination files and apply changes to the destination file.

To view a difference between the two files, click its entry in the difference list. To apply the difference, click the Apply button in the toolbar or choose Apply Difference from the Search Menu. To reverse a difference you've already applied, click the Unapply button or choose Unapply Difference from the Search Menu.


WARNING!

Currently, using the Apply Difference and Unapply Difference buttons erase all actions from the Undo stack. In other words, when you exit the Difference window after apply or unapplying, all undo and redo actions will have been cleared from the Undo stack.

To Compare Editor Files

To compare two files that are already open in editor windows, click on the Editor Files pop-up menu next to the source and destination paths, as shown in Figure 4.15. A list of open editor windows appears. Choose a file name from the menu to make it the source or destination file. Click Compare once the source and destination files are chosen to display the comparison window.


Choosing Folders To Compare

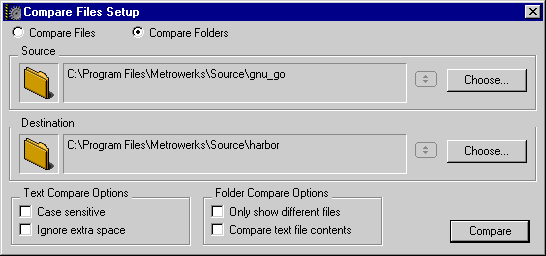
To open a folder comparison window, choose Compare Files from the Search Menu to show a dialog box that prompts you for two folders, the source and destination folders, to compare. To set these folders, drag and drop the folders into their respective boxes (Figure 4.16).


Windows

To enable Folder Comparison Options as described in the following section, click the Compare Folders radio button. Clicking this radio button also allows you to select folders by using the Choose buttons in the Compare Files Setup dialog box.


Folder Compare Options

Select Only Show Different Files to only display files that are different in both folders in the Files In Both Folders list of the Compare Folders window (Figure 4.17). By default, this option is disabled, so all files in the source and destination folders are displayed.
Comparisons between files in the source and destination folders are normally based upon the file modification dates and file sizes. This is usually good enough to determine if there are differences between the two files. If there are invisible items in the folders, the comparison will skip over those items.

Figure 4.16 Compare Folders Setup dialog box


Select Compare Text File Contents to perform a more accurate compare of the files in the two folders. In essence, this performs a Compare Files command on every file in the source and destination folders and checks neither the modification dates nor the file sizes. This option is a lot slower since every file has to be opened, but the comparison information is more accurate.

See "Text Compare Options" on page 129 for information on the file comparison options.

When you click the Compare button, the IDE displays the Folder Compare Results Window, as shown in Figure 4.17. Source code files, header files, text files, and folders appear in plain face. All other files appear italicized.
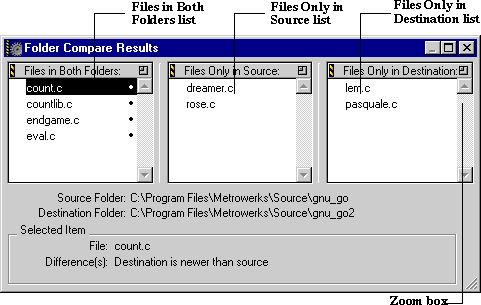
The Files In Both Folders list displays all files in both the source and destination folders unless the Only Show Different Files option is enabled. Files that are different in the two folders have a small bullet positioned to the right of their name.

When you click on a file in the Files In Both Folders list, Files Only In Source list, or Files Only In Destination list, specific information about the selected file appears in the Selected Item box at the bottom of the folder comparison window.

Figure 4.17 Folder Compare Results window


Double-click on a file in the Files In Both Folders list to open a Compare Files window for resolving the differences between the two differing files.

The Files Only In Source list displays all the files that appear only in the source folder while the Files Only In Destination list displays only files that appear within the destination folder.

You can click on a zoom box for any of the three lists to expand them to fill the window. Click again to collapse back to their original size.


Visit the Metrowerks website at: http://www.metrowerks.com
For assistance contact Metrowerks Technical Support at: support@metrowerks.com
Copyright © 1999, Metrowerks Corp. All rights reserved.

Last updated: May 24, 1999 * Chris Magnuson * John Roseborough